ASP.NET Core application
Supported Platforms
Instances
Supported web frameworks
| Framework | Supported versions |
|---|---|
| ASP.NET Core | .NET core (2.1 & 3.1), .NET (5.0 & 6.0) |
Prerequisite
Install the following Nuget packages
- Elastic.Apm.NetCoreAll
- Snappyflow.NetCoretrace.Utility
These packages can be installed using the Nuget package manager in Visual Studio or using .NET CLI commands given below.
dotnet add package SnappyFlow.NetCoretrace.Utility --version 0.1.6
dotnet add package Elastic.Apm.NetCoreAll --version 1.12.1
Configuration
.NET 6
Follow the below steps to enable the tracing for the .net applications which are developed using version 6.
Make sure that the project and the application are created in the SnappyFlow Server. Click Here to know how to create the project and application in SnappyFlow.
Create the
sftraceConfig.yamlfile inside the wwwroot directory.Add the below configuration in the
sftraceConfig.yamlfile and update the tags and key with the correct values.#sftraceConfig.yaml
tags:
projectName: CHANGEME
appName: CHANGEME
serviceName: CHANGEME
key: CHANGEMEUpdate the
program.csfile with the following changes:i. Add the below packages
  using Elastic.Apm.NetCoreAll;
  using SftraceDotNetcore;
ii. Add the below code after the intializing the builder variable with the
WebApplication.CreateBuilder(args)builder.Host.ConfigureAppConfiguration((hostingContext, config) =>
{
try
{
// sftraceConfigfile variable value should be match with file created in the wwwroot directory
string sftraceConfigfile = $"sftraceConfig.yaml";
config.AddInMemoryCollection(sftracedecrypt.Trace(sftraceConfigfile));
}
catch (Exception err)
{
System.Diagnostics.Debug.WriteLine("Error occurred in Snappyflow application trace" + err.Message);
}
}
);iii. Add the below line of code after calling the build() method on the Builder.
app.UseAllElasticApm(app.Configuration);Below is a example for
program.cswith required code changes.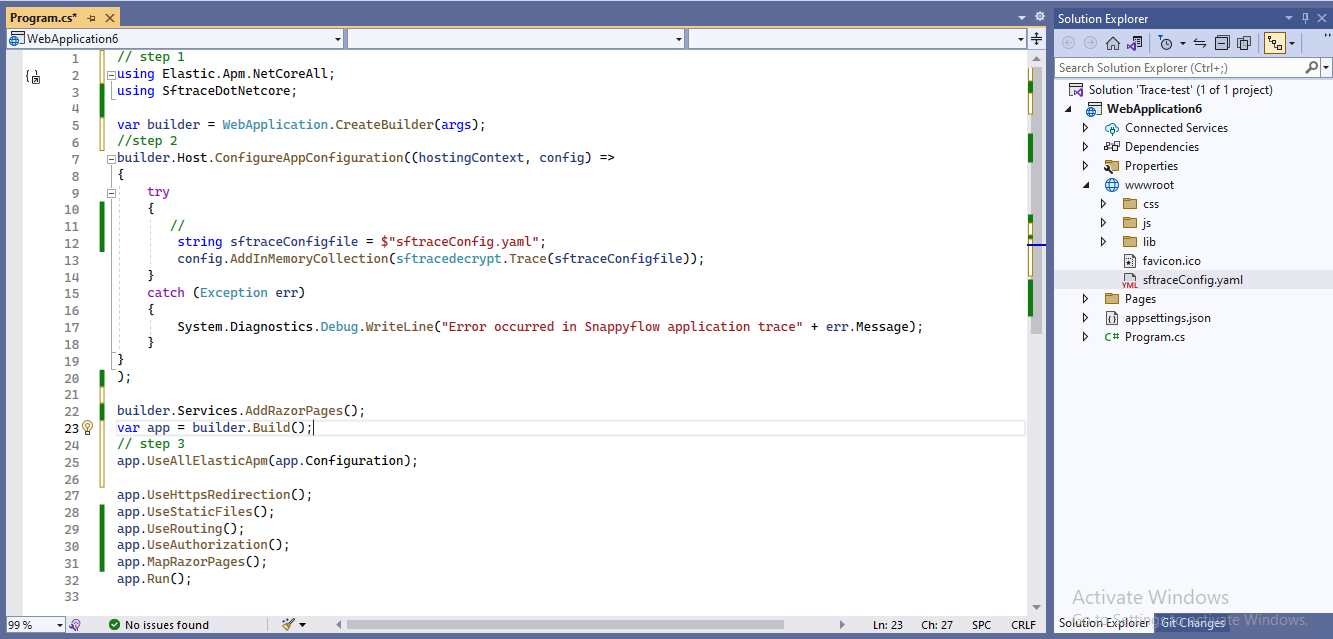
.NET 5
Follow the below steps to enable the tracing for the .net applications which are developed using version 5.
Create
sftraceConfig.<env_name>.yamlfile inside wwwroot directory. Copy below sftraceConfig.<env_name>.yaml content and configure it with correct profile key and tags. Get profile key from the Manage-->profile in snappyflow portal. Create project and application(or use existing project and applicaition) using your profile. You can provide any name to service, this will be displayed in Trace Dashboard.Change
<env_name>to your current working environment. For example if your environment is Development, your file name should besftraceConfig.Development.yaml
sftraceConfig.<env_name>.yaml
tags:
  projectName: CHANGEME
  appName: CHANGEME
  serviceName: CHANGEME
key: CHANGEME
Development is a common environment used while developing a web application, when you are using it in Production or any custom environmnent, you can change the yaml file name.
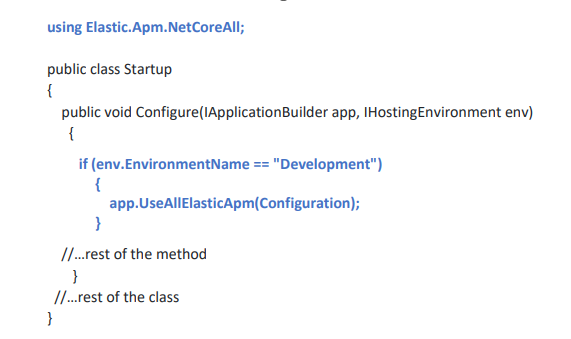
Startup.cs file changes
ASP.NET Core application contains Startup class. It is like Global.asax in the traditional .NET application. As the name suggests, it is executed first when the application starts.
Below is a example Startup.cs with required code changes highlighted in blue colour.
Startup.cs
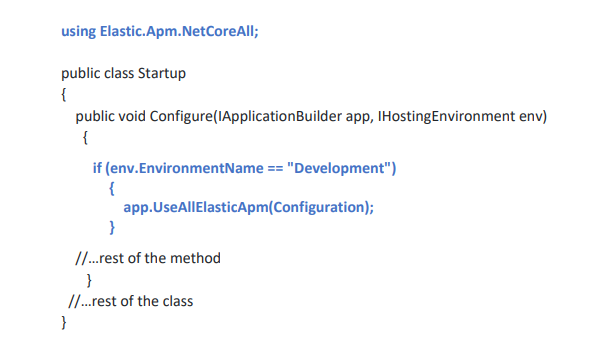
Copy the below codes in your Startup.cs file similar to the example above.
using Elastic.Apm.NetCoreAll;
Replace CHANGEME in code below with your application's environment (Development/Production) and add it inside configure method.
if (env.EnvironmentName == "CHANGEME")
  {
    app.UseAllElasticApm(Configuration);
  }
If you don't want to instrument for specific environment, add below line alone inside configure method.
app.UseAllElasticApm(Configuration);
Make sure to add app.UseAllElasticApm(Configuration) as first line in configuration method, otherwise the agent won’t be able to properly measure the timing of requests.
Program.cs file changes
ASP.NET Core web application is actually a console project which starts executing from the entry point public static void Main() in Program class where we can create a host for the web application.
Below is a example Program.cs with required code changes highlighted in blue colour.
Program.cs
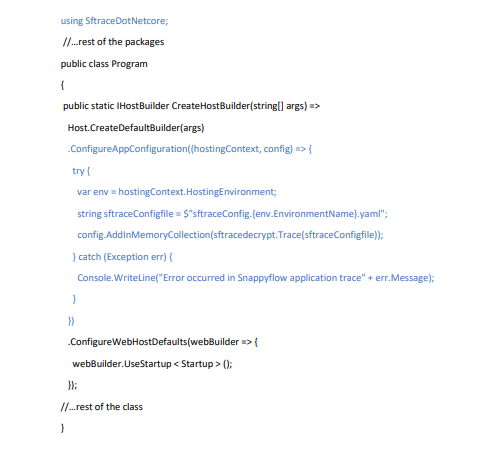
Copy the below codes in your Program.cs file similar to the example above.
using SftraceDotNetcore;
The below code should be added inside public static IHostBuilder CreateHostBuilder method in the same way how it's done in example file. Verify Example Program.cs to identify in which place below code should be placed.
.ConfigureAppConfiguration((hostingContext, config) => {
  try {
    var env = hostingContext.HostingEnvironment;
    string sftraceConfigfile = $"sftraceConfig.{env.EnvironmentName}.yaml";
    config.AddInMemoryCollection(sftracedecrypt.Trace(sftraceConfigfile));
  } catch (Exception err) {
    Console.WriteLine("Error occurred in Snappyflow application trace" + err.Message);
  }
})
Verification
Once your application is up and running, follow the below steps to verify that SnappyFlow has started to collect the traces.
- Navigate to the Project > Application > Application's dashboard.
- In the Dashboard window, go to the Tracing section.
- In the Tracing section, click the
View Transactionsbutton. - You can view the traces in Aggregate and Real Time tabs.
Containers
Supported Web frameworks
| Framework | Supported versions |
|---|---|
| ASP.NET Core | .NET core (2.1 & 3.1), .NET 5.0 |
Prerequisite
Install the following Nuget packages:
- Elastic.Apm.AspNetFullFramework
- Snappyflow.NetCoretrace.Utility
These packages can be installed using Nuget package manager in Visual Studio or using .NET CLI commands given below.
dotnet add package SnappyFlow.NetCoretrace.Utility --version 0.1.6
dotnet add package Elastic.Apm.AspNetFullFramework --version 1.12.1
- Enable the Docker in the project. For reference follow the official documentation (Click Here)
Steps to configure Application
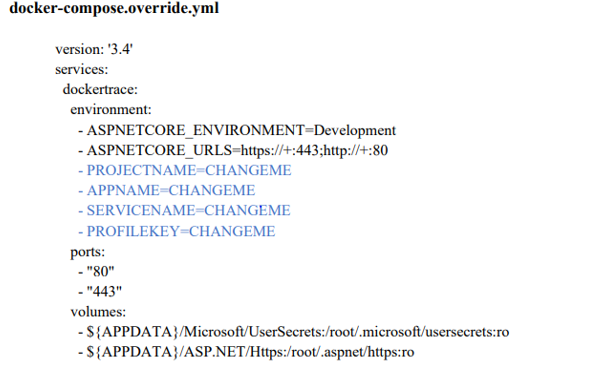
- Add the below content to the
docker-compose.override.ymlfile.
- PROJECTNAME=CHANGEME
- APPNAME=CHANGEME
- SERVICENAME=CHANGEME
- PROFILEKEY=CHANGEME
Place the
docker-compose.override.ymlunder the environment variables indocker-compose.ymlordocker-compose.override.yml.Get the profile key from the Manage > Profile in Snappyflow portal. Create a project and application using your profile (or use an existing project and application). You can provide any name to service, this will be displayed in Trace Dashboard. Below is an example
docker-compose.override.ymlwith required code changes highlighted in blue color.
Similar to configuring the environment variable into the docker, the same way you can configure the Kubernetes environment also. Wherever you are using the environment variable there you can add the above variables
Example:
- Create a new class file called
Sftrace_class.csin location where web.config file is present. Copy the code below and don't forget to changeCHANGENAMESPACE.
Startup.cs file changes
ASP.NET Core application contains Startup class. It is like Global.asax in the traditional .NET application. As the name suggests, it is executed first when the application starts.
Below is a example Startup.cs with required code changes highlighted in blue colour.
Startup.cs
Copy the below codes in your Startup.cs file similar to the example above.
using Elastic.Apm.NetCoreAll;
Replace CHANGEME in code below with your application's environment (Development/Production) and add it inside configure method.
if (env.EnvironmentName == "CHANGEME")
  {
    app.UseAllElasticApm(Configuration);
  }
If you don't want to instrument for specific environment, add below line alone inside configure method.
app.UseAllElasticApm(Configuration);
Make sure to add app.UseAllElasticApm(Configuration) as first line in configuration method, otherwise the agent won’t be able to properly measure the timing of requests.
Program.cs file changes
ASP.NET Core web application is actually a console project which starts executing from the entry point public static void Main() in the Program class where we can create a host for the web application.
Below is an example Program.cs with required code changes highlighted in blue color.
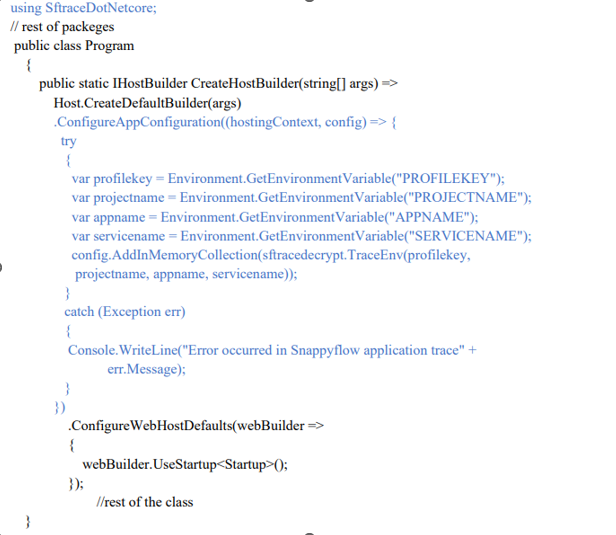
Copy the below codes in your Program.cs file similar to the example above.
using SftraceDotNetcore;
The below code should be added inside public static IHostBuilder CreateHostBuilder method in the same way how it's done in example file. Verify Example Program.cs to identify in which place below code should be placed.
.ConfigureAppConfiguration((hostingContext, config) => {
  try
  {
    var profilekey = Environment.GetEnvironmentVariable("PROFILEKEY");
    var projectname = Environment.GetEnvironmentVariable("PROJECTNAME");
    var appname = Environment.GetEnvironmentVariable("APPNAME");
    var servicename = Environment.GetEnvironmentVariable("SERVICENAME");
    config.AddInMemoryCollection(sftracedecrypt.TraceEnv(profilekey, projectname, appname, servicename));
  }
  catch (Exception err)
  {
    Console.WriteLine("Error occurred in Snappyflow application trace" +err.Message);
  }
 }
)
Now run your application with the F5 key, or the Ctrl+F5 key, selecting the docker-compose project, as shown below image

Change Profile key instructions (Only when changing profile key)
If you want to change your profile key in future, you need to remove the preexisting elasticapm data from web.config file and rebuild the project.
Instructions to change profile key
Proceed with caution
Remove preexisting elasticapm data from web.config file and rebuild the project.
Below code needs to be removed in web.config under <appsettings> if profile key is to be changed
    <add key="ElasticApm:ServerUrl" value="" />
    <add key="ElasticApm:GlobalLabels" value="" />
    <add key="ElasticApm:CentralConfig" value="" />
    <add key="ElasticApm:VerifyServerCert" value="" />
    <add key="ElasticApm:DisableMetrics" value="" />
    <add key="ElasticApm:ServiceName" value="" />
    <add key="ElasticApm:StackTraceLimit" value="" />
    <add key="ElasticApm:SpanFramesMinDuration" value="" />